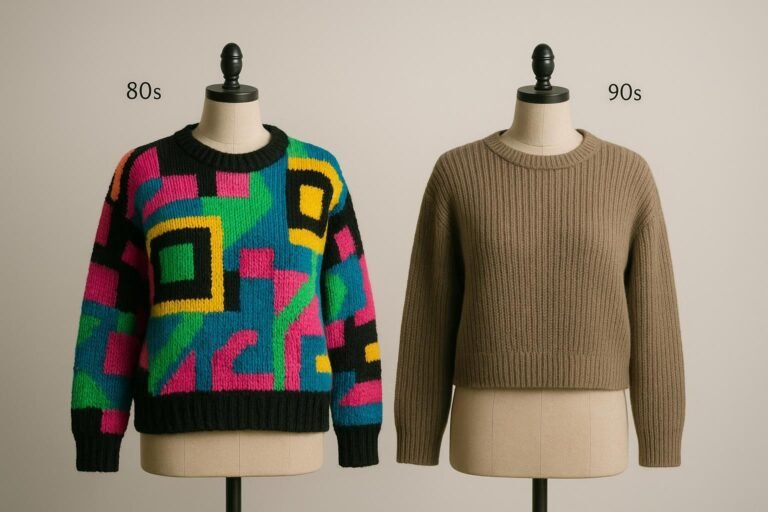
You want your knitwear to fit well and look nice. A knitwear sizing spec sheet guide helps you get the right fit. When you pick the right size, you feel happy and enjoy your clothes more. Here is how good sizing helps you:
Benefit | Impact on Customer Satisfaction and Repeat Purchases |
|---|---|
Fewer returns | Less frustration and more happiness |
Better customer happiness | More people buy again |
Customers who trust the fit will buy again.
Wrong sizing can make shoppers leave.
Special sizing tools help you feel sure.
You can learn to use these spec sheets, even if you are new. Let’s make sure your next knitwear fits you well.
Key Takeaways
Getting the right size means fewer returns and happier shoppers. This helps people buy again.
Use women’s size charts so your knitwear is not too tight or too loose.
Learn how to read spec sheets. This helps you match your body size to the garment size for a better fit.
Measure yourself with a soft tape. Write down your numbers so you can use them later.
Know what ease means. Positive ease makes clothes loose. Negative ease makes clothes tight.
Always make a gauge swatch. This helps you see how the yarn acts and makes sure your finished piece fits you.
Check your measurements twice. Look at brand size guides so you do not pick the wrong size.
Ask friends, yarn shops, or online groups for help. This can make you better at fitting your knitwear.
Why Accurate Sizing Matters
Comfort and Style
You want your knitwear to feel good and look great. Accurate sizing helps you achieve both comfort and style. When you use women’s size charts, you can avoid clothes that are too tight or too loose. This means you will not feel squeezed or lost in your sweater.
Here are some common comfort and style problems caused by incorrect sizing:
Garments feel uncomfortable if they are too tight or too loose.
Misreading women’s size charts can make your knitwear look awkward.
Not understanding the difference between body and garment measurements can lead to a poor fit.
The idea of “ease” matters. Negative ease makes clothes fit too snugly, while too much positive ease can make them look baggy.
You can use women’s size charts to check for the right amount of ease. This helps you choose a fit that matches your style, whether you want a close fit or something more relaxed.
Common Fit Issues
Many people feel stressed when trying on new clothes. You are not alone if you worry about finding the right fit. Surveys show that 88% of shoppers feel self-conscious about sizing. Seasonal changes can also make it harder to pick the right size, with 1 in 5 people feeling more frustrated during these times.
Some other common fit issues include:
Feeling unsure about which size to pick from women’s size charts.
Noticing that your size changes over time, which adds stress.
Struggling with navigating women’s size charts, especially if brands use different measurements.
You can reduce these problems by learning how to read women’s size charts and by measuring yourself carefully. This helps you feel more confident and less stressed when shopping for knitwear.
Benefits of Spec Sheets
Spec sheets give you the details you need for accurate sizing. They show you the exact measurements for each size in women’s size charts. Brands use these sheets to test garment measurements before making the clothes. This helps them avoid mistakes and keeps their sizing consistent.
Here are some ways spec sheets help you:
Brands can check garment measurements before production, which lowers the risk of fit problems.
You can compare your measurements to women’s size charts and pick the best size.
Spec sheets help brands meet your expectations, so you are less likely to return items.
Tools like SizeSense.ai use spec sheets to improve accuracy before any fabric is cut.
When you use women’s size charts and spec sheets together, you get the best chance for accurate sizing. This means you will enjoy your knitwear more and feel good about your choices.
Knitwear Sizing Spec Sheet Guide
What’s in a Spec Sheet
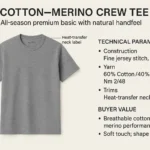
A knitwear sizing spec sheet guide gives you a clear list of measurements for each size. You will see the most important body parts listed, so you know exactly where to measure. Here are the key measurements you will find in a standard knitwear sizing spec sheet guide:
Chest/Bust: Measure around the fullest part of your chest or bust.
Center Back Neck–to-Wrist: Measure from the base of your neck at the back to your wrist.
Back Waist Length: Measure from the base of your neck to your natural waistline.
Cross Back: Measure from one shoulder to the other.
Arm Length: Measure from your armpit to your wrist.
Upper Arm: Measure around the widest part of your upper arm.
Armhole Depth: Measure from your shoulder to your armpit.
Waist: Measure at the smallest part of your waist.
Hip: Measure at the widest part of your hips.
Head Circumference: Measure around your head.
Foot Circumference: Measure around the widest part of your foot.
Sock Height: Measure from your heel to the top of your sock.
Total Foot Length: Measure from your heel to your longest toe.
Hand Circumference: Measure around your palm.
Wrist Circumference: Measure around your wrist.
Hand Length: Measure from your wrist to the tip of your longest finger.
You can use these measurements to compare your body to the sizes in the knitwear sizing spec sheet guide. This helps you pick the size that will fit you best.
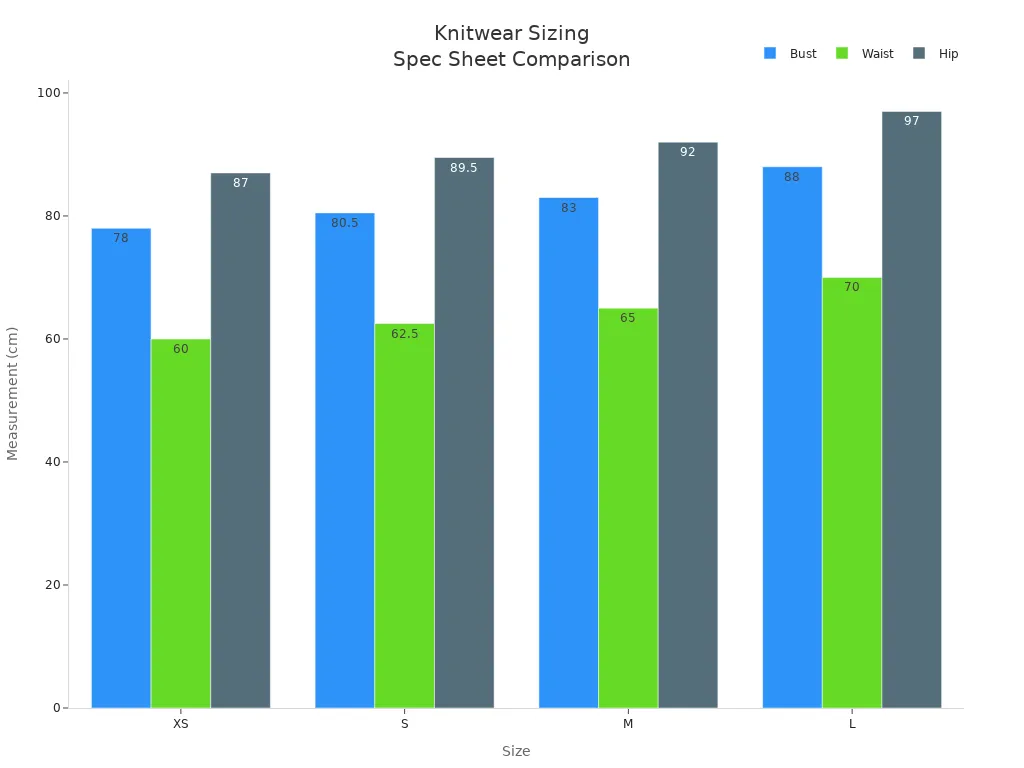
Here is a sample table you might see in a knitwear sizing spec sheet guide:
Measurement | XS | S | M | L |
|---|---|---|---|---|
BUST | 78CM | 80.5CM | 83CM | 88CM |
WAIST | 60CM | 62.5CM | 65CM | 70CM |
HIP | 87CM | 89.5CM | 92CM | 97CM |
Reading Measurement Charts
When you look at a knitwear sizing spec sheet guide, you will see measurement charts. These charts show the numbers for each size. You need to match your own measurements to the chart to find your best fit.
Measurement charts can look different from brand to brand. Some brands focus on certain measurements more than others. For example, one brand may care more about bust size, while another may focus on hip size. Brands also make charts for their main customers. They may use different rules for how much bigger or smaller each size gets. This can change how the clothes fit.
Tip: Always check the measurement chart for each brand. Do not assume your size is the same everywhere.
Here is a table that shows how brands may change their charts:
Aspect | Description |
|---|---|
Target Demographics | Brands make charts for their main customers. |
Measurement Priorities | Brands pick which measurements matter most for their style. |
Tolerances and Grading | Brands use different rules for how sizes change, which affects the garment. |
You can also see how bust, waist, and hip measurements change across sizes in this chart:
Schematic Diagrams
A knitwear sizing spec sheet guide often includes schematic diagrams. These diagrams show you a simple drawing of the garment. You will see lines and numbers that point to each part of the sweater, cardigan, or other knitwear piece.
Schematic diagrams help you see the shape and size of each part. You can look at the armhole, bust, sleeve, and other areas. This makes it easier to understand how the finished garment will look and fit. You do not have to guess what the numbers mean. The diagram shows you exactly where to measure.
Note: Use the schematic diagram to double-check your measurements. This helps you avoid mistakes and get the fit you want.
A knitwear sizing spec sheet guide gives you all the tools you need to make smart choices. You can read the charts, study the diagrams, and compare everything to your own body. This process helps you get a knitwear piece that fits well and feels comfortable.
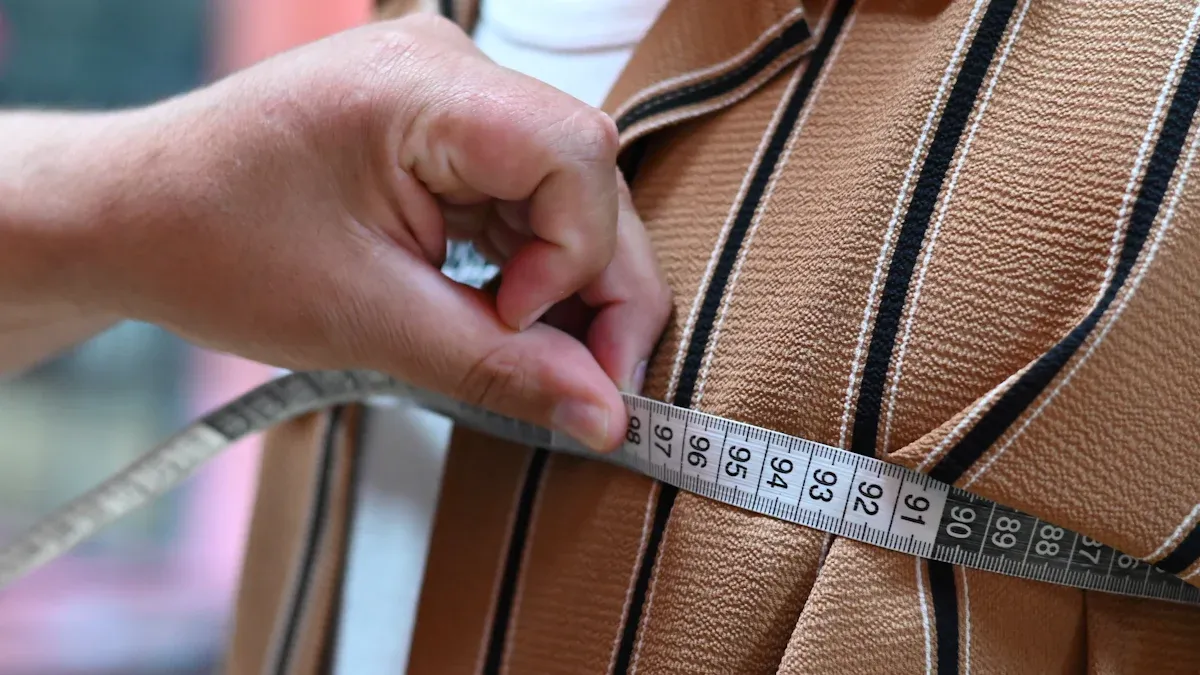
Measure Yourself for Accurate Sizing
Getting the right fit starts with measuring your body carefully. You need to use the right tools and follow clear steps. This helps you avoid mistakes when selecting knit top sizes and makes sure your knitwear feels comfortable.
Tools Needed
Professional knitwear designers use special tools for measuring your body. You can find most of these at home or in craft stores.
Flexible measuring tape (tailor’s tape)
Full-length mirror
Snug clothing, like leggings and a tank top
Piece of string (if you do not have a tape measure)
Notebook or a body measurement worksheet
Rulers or yardsticks
Adjustable dress forms
Notepad and pencil
A flexible measuring tape lets you measure curves and contours. A mirror helps you keep the tape straight and check your angles. You should wear fitted clothes so your measurements are not distorted.
Step-by-Step Measurement
You need to measure each part of your body in a straight line. Stand tall and relaxed. Keep the tape horizontal or vertical, depending on the area. You can also measure a well-fitting knit top to compare with your body measurements.
Bust/Chest
Stand straight with your arms at your sides.
Wrap the tape around the fullest part of your bust or chest.
Keep the tape parallel to the floor.
Make sure the tape is snug but not tight.
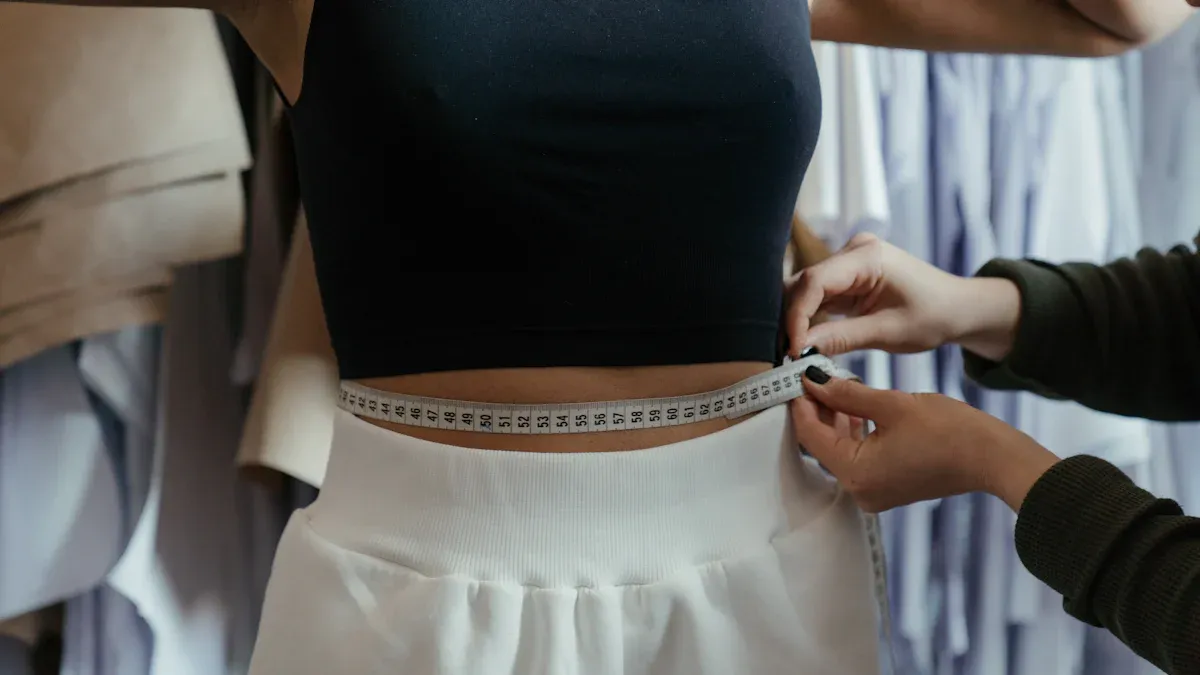
Waist
Find the smallest part of your waist, usually above your belly button.
Wrap the tape around your waist.
Keep the tape level and snug, but do not squeeze.
Hip
Stand with your feet together.
Measure around the widest part of your hips, about 7-10 inches below your waist.
Keep the tape straight and parallel to the floor.
Sleeve
Start at the top of your shoulder.
Measure down your arm to your wrist.
Keep your arm relaxed and slightly bent.
Length
Measure from the base of your neck down to where you want the knitwear to end.
Use a straight vertical line for accuracy.
Shoulder
Measure from one shoulder edge to the other.
Use a well-fitting shirt or ask a friend to help.
This helps you adjust for shoulder and armhole fit.
Tip: Always measure in straight lines. Use a mirror to check your tape position. If you want to adjust for shoulder and armhole fit, compare your measurements with a favorite knit top.
Double-Check and Record
Before you start measuring, get a sheet of paper or a notebook. Write down each measurement as you go. Wear the same undergarments and light clothing you plan to wear with your knitwear. This gives you the most accurate numbers.
Before you begin measuring, grab a sheet of paper to record each measurement. Dress in the style of undergarments you would typically wear for your sweater, along with a lightweight top and fitted pants for accurate hip measurements.
You should:
Use a flexible measuring tape, paper, and pen.
Stand straight and relaxed with arms at your sides.
Record all measurements on a dedicated sheet for future reference.
Here is a simple table to help you organize your measurements:
Body Part | Measurement (inches/cm) |
|---|---|
Bust/Chest | |
Waist | |
Hip | |
Sleeve | |
Length | |
Shoulder |
Accurate measuring your body helps you select the best size and avoid mistakes. You can also measure existing well-fitting garments to compare with your own numbers. This step is important for selecting knit top sizes and making sure your knitwear fits well.
Compare Measurements for the Perfect Fit
Match Body to Garment
You want to make sure your knitwear feels comfortable and looks great. Start by matching your body measurements to the numbers on the spec sheet. This step helps you get closer to finding the perfect fit. When you measure, wear close-fitting clothes. Ask someone to help you if possible, because raising your arms can change the numbers. Keep the measuring tape level and snug, but do not pull it too tight.
Here are some tips for matching your body to the garment:
Use Upper Torso Circumference and Bust Circumference to decide which sweater size works best.
Always check the amount of ease listed in the pattern. Ease means how much extra room the garment has.
Compare your numbers to the chart and look at the schematic diagram for each part of the garment.
Tip: Matching your measurements to the garment spec sheet helps you avoid common sizing mistakes and brings you closer to finding the perfect fit.
Between Sizes
Sometimes your measurements fall between two sizes. This is normal, and you have options to help you with finding the perfect fit. You can look at the amount of ease the pattern suggests. Think about how you want the garment to feel. Do you like a looser sweater or a snug fit? Adjust your choice based on your actual body measurements.
Here are some strategies for handling in-between sizes:
Choose the size that matches your Upper Torso Circumference if it is much smaller than your Bust Circumference.
Add bust darts for a better fit if needed.
Make changes like waist shaping or adjusting sleeve and hem lengths by using the schematic diagram.
Consider your personal style and comfort when picking a size.
Note: Picking the right size when you are between sizes helps you get a garment that feels good and looks right. This step is important for finding the perfect fit.
Using Finished Garment Measurements
Finished garment measurements show you how the knitwear will fit after it is made. These numbers help you decide how much ease you want. Positive ease means the garment will fit loosely. Negative ease means the garment will fit tightly. Understanding ease helps you select the right size for your body.
Use finished garment measurements to:
See how much room you will have in the sweater.
Decide if you want a relaxed or close fit.
Make sure the garment matches your comfort and movement needs.
Remember: Finished garment measurements are key for finding the perfect fit. They help you see how the knitwear will look and feel before you start.
When you compare your body measurements to the spec sheet and finished garment measurements, you get closer to the perfect fit. This process helps you feel confident and happy with your knitwear choices.
Adjust for Fit Preferences
Standard vs. Custom Fit
You can choose between a standard fit and a custom fit for your knitwear. Standard sizing uses average measurements from many people. This type of sizing works for most people and is easy to follow. Custom sizing uses your own body measurements. You can change the pattern to fit your shape and style.
Standard sizing fits the majority of people.
Custom sizing lets you adjust the garment for your body.
Your choice affects how the knitwear looks and feels.
If you want a sweater that feels like it was made just for you, custom sizing is the best choice. If you want something quick and simple, standard sizing works well.
Body Shape Adjustments
Everyone has a unique body shape. You can make your knitwear fit better by adjusting patterns. Start by taking accurate measurements. Ask a friend to help you measure your bust, waist, hips, and arms. Write down these numbers.
Here are steps you can follow for body shape adjustments:
Take accurate measurements at all the important spots.
Decide how much extra room, or ease, you want in your garment.
Match your numbers to the pattern schematic. Change the number of stitches or rows if needed.
Patterns act like blueprints. You can edit them to fit your body. Adjusting patterns helps you add or remove stitches and rows. You can also change the shape by adding waist shaping or making the sleeves longer or shorter.
Understand the style of your project before making changes.
Add or subtract stitches and rows to get the right size.
Place shaping where your body needs it, like at the waist or hips.
You can make your knitwear fit your body by adjusting patterns. This gives you a garment that feels comfortable and looks great.
Choosing Ease
Ease is the space between your body and the knitwear. You can pick how much ease you want. There are three main types:
Positive ease gives you extra space. Your sweater will feel loose and relaxed.
Negative ease means the garment hugs your body. This works well if your yarn stretches.
Zero ease means the knitwear fits your body exactly. You get a snug fit.
Think about how you want your sweater to feel. If you like a cozy, roomy sweater, choose positive ease. If you want a fitted look, try negative ease. Zero ease works if you want something in between.
Tip: Always check the pattern for the suggested ease. This helps you pick the right size and style for your comfort.
Choosing the right fit makes your knitwear project a success. You can enjoy a sweater that matches your style and feels good every time you wear it.
Understanding Ease in Knitwear
What Is Ease
Ease is an important idea in knitwear sizing. It shows how much bigger or smaller a garment is than your body. In knitwear, ease means the difference between the garment’s size and your body’s size. There are three types of ease:
Positive ease means the garment is bigger than your body. You get extra space to move. Winter coats and loose sweaters use positive ease.
Negative ease means the garment is smaller than your body. The fabric stretches to fit you. Tights and fitted tops use negative ease.
Zero ease means the garment is the same size as your body. You get a close fit. Camisoles and some fitted shirts use zero ease.
Most sweaters have positive ease. The finished size is larger than your measurements. You get extra fabric for comfort and movement.
Positive vs. Negative Ease
You should know how positive and negative ease change your knitwear. Designers use ease to make different styles and fits. You can see the differences in the table below:
Type of Ease | Description |
|---|---|
Positive Ease | Garment is bigger than your body, so you feel comfy and can move easily. |
Negative Ease | Garment is smaller than your body, so it fits tightly and hugs your shape. |
Zero Ease | Garment and body are the same size, so it fits closely and needs stretchy fabric. |
Knit fabrics often use negative ease. The loops in the fabric stretch and move with you. You get a close fit that feels good. Designers use ease for style too. You might want a loose sweater or a tight top. You pick the amount of ease for your comfort and style.
Functional ease helps you move and feel good.
Stylistic ease changes how your garment looks.
You can follow these steps when picking ease:
Positive ease gives you more fabric to move. Sweaters with positive ease are usually 2-4 inches bigger than your body.
Negative ease lets the garment stretch and fit tightly. Ribbed tops and leggings use negative ease.
Comfort and Movement
Ease changes how your knitwear feels and moves. You want your sweater to be comfy and easy to wear. The right amount of ease helps you move your arms, bend, and sit without feeling squeezed. Knit fabrics stretch and let air in, so you stay cool and dry.
Fabric Property | Impact on Comfort |
|---|---|
Moisture Management | Moves sweat away from your skin, so you feel cool and dry. |
Air Permeability | Bigger holes let air move through, so you feel cooler. |
Thermal Resistance | Helps the fabric keep you at a good temperature, even when it’s hot or cold outside. |
You can pick more ease for a soft, roomy fit. You can choose less ease for a tight look. Always think about how you want your knitwear to feel when you wear it. The right ease gives you comfort and lets you move freely.
Yarn Stretch and Gauge Swatch
Yarn Types and Stretch
You need to understand how yarn type affects the stretch and fit of your knitwear. Some yarns stretch more than others. Stretch yarns, like those with spandex, can stretch and return to their original shape. This makes them perfect for activewear and clothes that need to fit closely. Cotton yarn has low elasticity and does not bounce back well. Acrylic yarn stretches more and recovers better, so it works well for form-fitting garments.
Yarn Type | Elasticity | Recovery Rate | Suitable For | |
|---|---|---|---|---|
Cotton | Low | Low | Poor | Non-shaped objects |
Acrylic | High | High | Good | Form-fitting garments, activewear |
You should also think about other yarn features:
Weight of the Yarn: This changes how your knitwear drapes and keeps its shape.
Fiber Content: This affects how stretchy, warm, or soft your garment feels.
Stretch Rate: This tells you how much the yarn can expand.
Recovery Rate: This shows how well the yarn returns to its shape after stretching.
Choosing the right yarn helps you get the fit and comfort you want.
Gauge Swatch Importance
You must always make a gauge swatch before starting your project. A gauge swatch is a small sample you knit to test your tension and see how the yarn behaves. This step helps you make sure your finished garment matches the size you want.
Ensures finished measurements are as expected.
Accounts for differences in tension among knitters, leading to consistent sizing across different individuals.
Helps in determining the correct amount of yarn needed for the project, preventing shortages or excess.
If you skip this step, your sweater might turn out too big or too small. Each person knits with a different tension, so your gauge may not match the pattern. Making a swatch saves you time and yarn in the long run.
Tip: Always use the same needles and yarn for your swatch as you will for your project.
Pre-wash and Blocking
You need to treat your gauge swatch the same way you will treat your finished knitwear. Washing and blocking your swatch shows you how the yarn will behave after you finish your project.
If you go through the trouble of swatching, but do not treat your swatch the way you are going to treat your finished project, you might as well not swatch at all. There are a wide variety of variables that affect the outcome of a blocked item versus an unblocked one, including fiber content, stitch pattern, and density of fabric. Just as different fabric substrates behave differently when washed and dried, different yarns will bloom and grow differently when blocked.
Follow these steps to block your swatch:
Wet block your swatch by soaking it for 15-20 minutes in cool water with a little no-rinse wool wash.
Squeeze out excess water without wringing.
Roll in a towel and squeeze firmly until damp-dry.
Lay flat and pin to the desired gauge.
Before you measure, pat your swatch into shape and pin the edges to a blocking board. This keeps the edges from curling and helps you get accurate measurements. Blocking lets you see the true size and drape of your fabric, so your finished knitwear fits just right.
Confirming the Perfect Fit
Make a Swatch or Mock-Up
You want your knitwear to match your vision and feel comfortable. Before you start your main project, you should make a swatch or a mock-up. This small sample helps you check your stitch gauge and see how the yarn behaves. You can spot problems early and avoid wasting time or materials.
Here are some reasons to make a swatch or mock-up:
You match your stitch gauge to the pattern, which helps you get the perfect fit.
You avoid waste by finding gauge issues before starting the full project.
You learn how your yarn drapes and stretches.
You test color and texture combinations.
You spot potential problems before you knit the whole garment.
You can also look at the benefits in this table:
Benefit | Description |
|---|---|
Understanding Yarn Behavior | You see how your yarn acts, especially with special colors or textures. |
Achieving the Right Fit | You match your gauge to the pattern, so your knitwear fits as planned. |
Saving Time and Materials | You avoid redoing large parts of your project, saving yarn and effort. |
Building Confidence | You practice new techniques and feel ready for the main project. |
Creating a Record for Future Projects | You keep notes for future projects, so you do not need to swatch again. |
Try On and Assess
After you finish your mock-up, you need to try it on and check the fit. This step helps you see if your knitwear matches your body and style. You should look at the overall shape and comfort. Move around to test how the garment feels when you sit, stretch, or reach.
Follow these steps to assess your fit:
Look at the garment and see if it matches your style.
Check for tight spots, pulling, or loose areas.
Examine the pattern shape and see if it fits your body.
Move your arms and body to test comfort and function.
Write down any changes you want, like adjusting the sleeves or neckline.
Review your notes and decide what to change for the perfect fit.
Tip: Always document your comments and requests during the fitting session. This helps you remember what to adjust and keeps your project on track.
Final Adjustments
You may need to make final adjustments to get the perfect fit. These changes help your knitwear feel comfortable and look balanced. You can tailor the sleeves, reshape the body, or fix the hem length.
Common adjustments include:
Adjusting sleeves for better length.
Reshaping the body by taking in or letting out stitches.
Shortening the hem for balance.
Fixing the neckline for comfort.
Reinforcing seams to prevent holes.
Updating the style if you want a fresh look.
Sometimes you need to increase or decrease the bustline if you see drag lines or looseness. You can pinch out extra fabric at the armhole to fix gaping. These small changes help you achieve the perfect fit and enjoy your knitwear every time you wear it.
Remember: Making final adjustments is a normal part of the process. You can always improve your project for the best result.
Mistakes to Avoid
You want your knitwear to fit well and feel comfortable. Many people make simple mistakes that can ruin the final result. If you know what to watch out for, you can avoid problems and enjoy your new sweater or cardigan. Here are the most common mistakes you should avoid:
Skipping the Swatch Step
You might feel excited to start knitting, but skipping the swatch can lead to trouble. If you do not make an accurate swatch, your garment may turn out smaller or larger than you planned. Always knit a swatch with the same yarn and needles you will use for your project.Ignoring Fabric Characteristics
Yarn types behave differently. Cotton does not stretch much, while acrylic stretches more. If you ignore how your yarn acts, your finished knitwear may not look or feel right. Always check the yarn label and test how it stretches and recovers.Not Trying On During Knitting
You should try your sweater on as you knit. If you wait until the end, you may find fit problems that are hard to fix. Slip your work onto a spare needle or use a lifeline to check the fit as you go.Choosing Size Without Personal Measurements
Picking a size based only on a pattern or chart can lead to a poor fit. You need to measure your bust, waist, hips, and other key areas. Use these numbers to select the best size for your body.Following the Pattern Without Adjustments
Patterns use standard measurements. Your body may not match these exactly. If you knit strictly by the pattern, you may end up with a sweater that feels awkward. Adjust stitch counts or shaping to match your body.Selecting Styles That Do Not Suit Your Body Shape
Some sweater styles look better on certain body shapes. If you choose a design that does not flatter your figure, you may not want to wear it. Look for patterns that highlight your favorite features.Using Poorly Designed Patterns
Even if you follow instructions perfectly, a badly designed pattern can cause fit issues. Read reviews and look for patterns from trusted designers. Check if others have had success with the pattern before you start.
Tip: Take your time with each step. Double-check your measurements, swatch, and pattern choice. You will save time and enjoy a better result.
Mistake | Why It Matters |
|---|---|
Skipping the swatch | Garment may not fit as planned |
Ignoring fabric traits | Final product may not look or feel right |
Not trying on | Hard to fix fit issues after finishing |
Wrong size selection | Poor fit and discomfort |
No pattern adjustments | Awkward fit for unique body shapes |
Wrong style choice | Garment may not flatter your figure |
Bad pattern | Fit problems even with careful knitting |
If you avoid these mistakes, you will get a knitwear piece that fits well and feels great. Careful planning and attention to detail make all the difference.
Practical Tips for Accurate Sizing
Double-Check Measurements
You want your knitwear to fit just right. Double-checking your measurements helps you avoid mistakes and get the best results. Many people rush this step, but taking your time makes a big difference. You should always measure key areas before you start your project. Use a flexible tape and stand in front of a mirror for accuracy.
Here are some effective tips for double-checking your knitwear measurements:
Cross-check your size with the pattern’s size guide. Sizes can change between patterns.
Measure important areas like sweater length, chest, hips, arm circumference, arm length, back width, or head circumference.
Make sure you measure the correct parts of your body before you compare your numbers to the pattern’s size guide.
Tip: Write down each measurement as you go. Double-check by measuring twice. If you get different numbers, measure again until you feel sure.
Use Brand Guides
Every brand has its own sizing guide. These guides help you match your body measurements to the right size. You should always check the brand’s chart before you buy or start a project. Brand guides show you which measurements matter most for each style.
Body Area | Measurement Type |
|---|---|
Bust | Key measurement |
Waist | Key measurement |
Hips | Key measurement |
Sleeve Length | Specific dimension |
Size charts give you a framework for picking the best fit. You can compare your numbers to the chart and see which size works for you. Some brands use different sizing rules, so their clothes may fit differently. These charts help you avoid surprises and find a sweater that feels comfortable.
Size charts help you sort clothing sizes by body measurements.
You can use them to compare your numbers and choose the best fit.
Brand sizing philosophies can vary, so these charts are essential for accuracy.
Understanding size charts helps you avoid problems like ill-fitting garments. You can decode sizing differences and pick knitwear that matches your body and style.
Keep Notes
You should keep notes during every step of your knitwear project. Write down your measurements, the brand guide you used, and any changes you made. Keeping notes helps you remember what worked and what did not. You can use these notes for future projects or share them with friends.
Record each measurement in a notebook or on your phone.
Write down the brand and pattern details.
Note any adjustments you made for fit or comfort.
Save your notes for your next project.
Keeping good notes saves you time and helps you get better results. You can look back and see what made your knitwear fit perfectly.
Ask for Help
You do not have to figure out knitwear sizing alone. Many people feel confused when they read spec sheets or measure their bodies. You can ask for help and get better results. Support makes the process easier and helps you avoid mistakes.
You can reach out to different sources for help:
Friends or Family: Ask someone to help you measure your body. Another person can hold the tape straight and read the numbers. This makes your measurements more accurate.
Local Yarn Shops: Visit a yarn store in your area. Staff members often know about sizing and patterns. They can show you how to use a measuring tape or explain a spec sheet.
Online Communities: Join knitting groups on social media or forums. You can post questions and get answers from experienced knitters. Many people share tips and photos to help you learn.
Customer Service: Contact the brand or pattern designer. Many companies offer chat, email, or phone support. You can ask about sizing charts, yarn choices, or pattern adjustments.
Professional Tailors: If you want expert advice, visit a tailor. Tailors know how to measure bodies and adjust patterns for a perfect fit.
Tip: Do not feel shy about asking questions. Most people enjoy sharing their knowledge and helping others.
You can use online resources to find answers quickly. Many websites have videos that show how to measure your body or read a schematic diagram. You can watch these videos and follow along at home.
Here is a table that shows where you can get help and what you might learn:
Source | What You Can Learn |
|---|---|
Friends/Family | Accurate body measurements |
Yarn Shop Staff | Sizing tips, pattern advice |
Online Communities | Troubleshooting, fit solutions |
Customer Service | Brand-specific sizing, product details |
Tailor | Custom adjustments, expert fitting |
You can also join knit-alongs or workshops. These events let you meet other knitters and learn together. You can see how others solve sizing problems and share your own experiences.
If you feel stuck, take a break and ask for help. You will learn new skills and feel more confident. Getting support helps you enjoy your knitwear project and get the fit you want.
Remember: Asking for help is a smart way to improve your results. You can learn from others and avoid common mistakes.
You now have the tools to achieve the perfect knitwear fit. Start by measuring yourself carefully. Use the spec sheet to match your numbers. Understand ease and always knit a gauge swatch. These steps help you avoid mistakes and create comfortable, stylish pieces. Trust your skills and apply what you learned to every project. Enjoy the confidence that comes with wearing knitwear made just for you! 🧶
FAQ
How do you read a knitwear sizing spec sheet?
You look at the chart for measurements like bust, waist, and hip. You match your body numbers to the chart. You check the schematic diagram for where to measure.
What tools do you need for accurate body measurements?
You need a flexible measuring tape, a mirror, and a notebook. You wear fitted clothes. You can ask a friend to help for better accuracy.
Why is a gauge swatch important before knitting?
A gauge swatch helps you see how your yarn and needles work together. You check if your stitches match the pattern. This step helps you avoid fit problems.
What does “ease” mean in knitwear sizing?
Ease means the space between your body and the garment. Positive ease gives you a loose fit. Negative ease gives you a tight fit. Zero ease fits you exactly.
Can you adjust a pattern if you fall between sizes?
Yes, you can change stitch counts or row numbers. You can add shaping for bust, waist, or hips. You use the schematic diagram to guide your changes.
What should you do if your knitwear feels too tight or too loose?
You check your measurements and the pattern’s ease. You can block your garment to adjust the fit. You may need to change the size next time.
Where can you get help with sizing or patterns?
You can ask friends, visit a local yarn shop, or join online knitting groups. You can contact customer service or talk to a tailor for expert advice.