Featured Snippet:
To crochet a cardigan, follow this standard workflow: first, measure your bust, arm length, and desired garment length. Select a pattern and matching yarn (typically DK or worsted weight). Create a gauge swatch to ensure correct sizing. Most beginner cardigans are constructed using the panel method: crochet one back panel, two front panels, and two sleeves. Block these pieces to shape, then seam the shoulders and sides. Finally, add ribbing to the cuffs, hem, and neckline for a professional finish.
Crocheting a garment is a significant step up from making scarves or blankets. It requires an understanding of structure, fit, and fiber behavior. While a scarf is two-dimensional, a cardigan is three-dimensional engineering intended to move with the human body.
This guide provides a professional, step-by-step framework for creating a well-fitting crochet cardigan. We will focus on the most accessible construction method for beginners—the drop-shoulder panel method—while providing the technical context necessary to customize and troubleshoot your work.
1) What Is a Crochet Cardigan?
In technical terms, a cardigan is a knitted or crocheted garment with an open front. Unlike a pullover or sweater, which must be pulled over the head, a cardigan is fastened (buttons, zippers, ties) or left open.
Key Characteristics:
-
Open Front: Two front panels allow for versatility in styling and temperature regulation.
-
Structure: It requires distinct finishing on the front edges (button bands or collars) to prevent curling and provide stability.
-
Fit: Cardigans generally require “positive ease” (being slightly larger than body measurements) to be worn comfortably over other layers.
Crochet vs. Knitting:
It is vital to understand that crochet fabric is structurally different from knitted fabric. Crochet stitches are knots, making the fabric thicker, denser, and generally heavier than knitting. A crochet cardigan will consume approximately 30% more yarn than a knitted cardigan of the same size. Therefore, your choice of stitch and yarn is critical to avoid creating a garment that feels stiff or heavy.
2) Before You Start: What You Need
Garment success begins with material selection. Using the wrong tools will result in a cardigan that looks homemade rather than handmade.
Yarn Selection
For a first cardigan, avoid heavy chunky wools (too hot/heavy) or fine lace weights (too slow).
-
Worsted (Aran) Weight: The standard for beginners. It works up quickly but offers decent definition.
-
DK (Double Knit) Weight: Lighter and distinctively more professional in drape. It takes longer but produces a more fluid fabric.
Hook Sizes
You will likely need two hooks:
-
Main Hook: For the body of the cardigan (match this to your gauge).
-
Ribbing Hook: One size smaller (e.g., use 4.5mm if main is 5.5mm) for cuffs and hemlines to ensure elasticity.
Essential Notions
-
Tape Measure: Use a flexible sewing tape, not a construction ruler.
-
Stitch Markers: Locking markers are essential for marking armholes and ensuring stitch counts remain consistent on long rows.
-
Darning/Tapestry Needle: For seaming and weaving in ends. Metal needles glide better than plastic.
-
Buttons (Optional): Ensure they are lightweight enough not to drag down the front opening.
3) Understanding Cardigan Construction
Before crocheting a single stitch, you must understand the architecture of the garment. There are four primary methods.
Table: Construction Methods Comparison
| Construction Type |
Description |
Difficulty |
Best For |
| Panel-Based (Drop Shoulder) |
Made of 5 flat rectangles (1 back, 2 fronts, 2 sleeves). Seamed together at the end. |
Beginner |
First-time garment makers; boxy/oversized fits. |
| Top-Down Raglan |
Worked in one piece from the neck down. Sleeves are crocheted directly onto the body. No seaming. |
Intermediate |
Seamless look; fitted styles; trying on as you go. |
| Bottom-Up Seamless |
The body is worked in one large piece up to the armpits, then split for front/back. |
Intermediate |
avoiding side seams; ensuring hip circumference fits first. |
| Hexagon/Granny |
Two large hexagons folded to create “L” shapes, then seamed. |
Beginner |
Viral trends; loose, unstructured shrugs. |
Recommendation: This guide focuses on the Panel-Based (Drop Shoulder) method. It is the most forgiving because you can measure and block each piece individually before committing to the final fit.
4) Taking Measurements & Choosing a Size
Garment patterns are mathematical formulas based on body measurements. Do not guess your size based on T-shirt sizing (S/M/L), as crochet standards vary.
Key Body Measurements
Measure wearing the undergarments or layers you intend to wear under the cardigan.
-
Bust Circumference: The widest part of the chest.
-
Back Width: Shoulder bone to shoulder bone.
-
Armhole Depth: Top of the shoulder to the underarm (critical for comfort).
-
Arm Length: Shoulder bone to wrist.
-
Desired Length: Shoulder to hem (cropped, hip-length, or longline).
Understanding “Ease”
Ease is the difference between your body measurement and the finished garment measurement.
-
Negative Ease: Smaller than body (tight fit). Rarely used for cardigans.
-
Zero Ease: Exact body measurement.
-
Positive Ease: Larger than body.
Example: If your bust is 36 inches and you want a classic fit, you should crochet a size that measures 38–40 inches around the chest.
5) Gauge: Why It Matters and How to Check It
Do not skip this step. 90% of “my cardigan doesn’t fit” issues stem from ignoring gauge.
What is Gauge?
Gauge is the number of stitches and rows per inch (or 4×4 inch square) using a specific yarn and hook.
How to Swatch:
-
Chain enough stitches to measure 5 to 6 inches.
-
Crochet in your chosen stitch pattern for 6 inches.
-
Measure a 4×4 inch square in the center of the swatch.
-
Count the stitches and rows.
The Impact:
If the pattern calls for 15 stitches per 4 inches, and you have 13 stitches: Your stitches are too big. Your cardigan will be huge. Switch to a smaller hook.
If you have 17 stitches: Your stitches are too tight. Your cardigan will be too small. Switch to a larger hook.
6) Step-by-Step: How to Crochet a Basic Cardigan (Beginner Method)
We will construct a “Drop Shoulder” cardigan. This style relies on rectangular geometry, minimizing complex shaping.
Step 1: The Back Panel
This is usually a simple rectangle.
-
Width: (Bust measurement + Ease) ÷ 2.
-
Length: Desired total length from shoulder to hem.
-
Process: Chain the width required. Work in rows using your chosen stitch until the piece reaches the desired length. Fasten off.
Step 2: The Front Panels
You need two symmetrical panels (Left and Right).
-
Width: (Back Panel Width ÷ 2) minus 1–2 inches (to account for the button band added later).
-
Length: Same as the Back Panel.
-
Neckline Shaping (Optional): For a V-neck, you will decrease stitches on the inner edge starting at the chest line. For a basic beginner cardigan, you can make straight rectangles and create a “boat neck” or “kimono” style opening.
Step 3: Shoulder Seaming
Before doing anything else, join the shoulders.
-
Lay the Back Panel flat.
-
Place Front Panels on top, right sides facing each other.
-
Seam the top edges (shoulders) using a whip stitch or mattress stitch. Leave the center open for the neck.
Step 4: The Sleeves
In a drop-shoulder construction, you have two options for sleeves:
-
Crochet Flat: Make a trapezoid (wider at top, narrower at cuff) based on arm length and armhole depth. Seam it into a tube later.
-
Crochet Directly: Attach yarn to the armhole edge of the body (now that shoulders are seamed) and crochet in rows or rounds down to the wrist, decreasing stitches periodically to taper the sleeve.
Pro Tip: Mark the center of your sleeve cap and match it to the shoulder seam to ensure the sleeve hangs straight.
Step 5: Side and Sleeve Seaming
If you crocheted the sleeves flat:
-
Lay the garment open (Back and Fronts flat).
-
Sew the top of the sleeve to the armhole opening.
-
Fold the garment at the shoulders (inside out).
-
Sew from the hem, up the side seam, into the armpit, and all the way down the sleeve to the cuff in one continuous line.
Step 6: Ribbing and Edging
Raw crochet edges are unstable. You must add a border.
-
Bottom Hem: Attach yarn to the bottom. Crochet a ribbing band (often using Back Loop Only single crochet).
-
Cuffs: Add ribbing to sleeve ends.
-
Front Band/Collar: Crochet rows along the inner edges of the front panels and around the neck. This is where you create buttonholes (by chaining 1 and skipping a stitch) if desired.
7) Stitches That Work Best for Cardigans
Not all stitches are suitable for garments. You want a balance of drape (flexibility) and opacity (coverage).
-
Extended Half Double Crochet (EHDC): Excellent drape. Taller than a standard HDC, less stiff than a single crochet.
-
Moss Stitch (Linen Stitch): Alternating SC and Chain 1. Creates a woven, flat fabric that doesn’t stretch out of shape easily. Good for structure.
-
Griddle / Lemon Peel Stitch: Alternating SC and DC. Provides great texture without being too “holey.”
-
Avoid: Basic Single Crochet for the whole garment (too stiff/board-like) or basic Treble Crochet (too gappy/structureless).
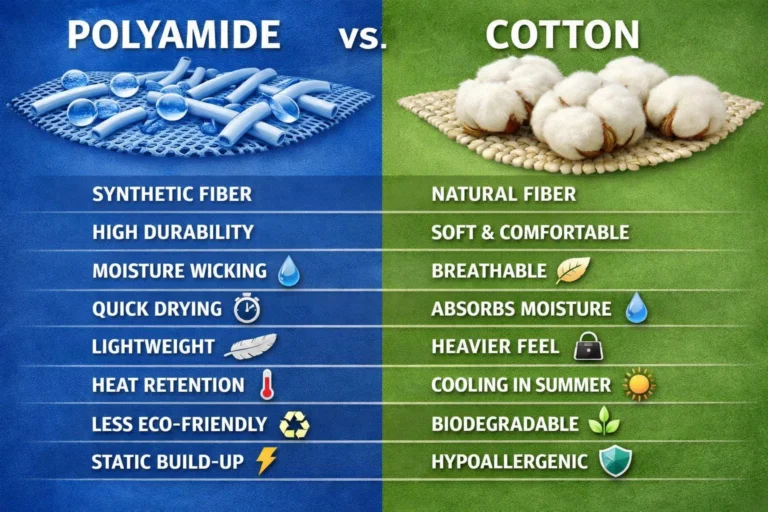
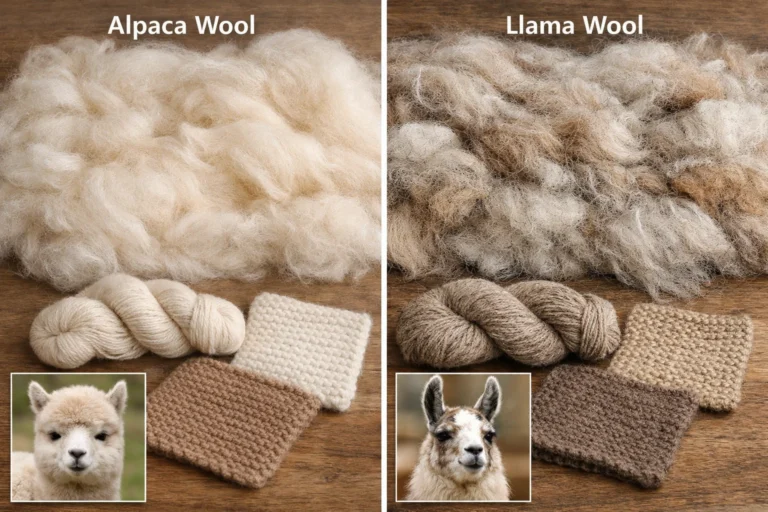
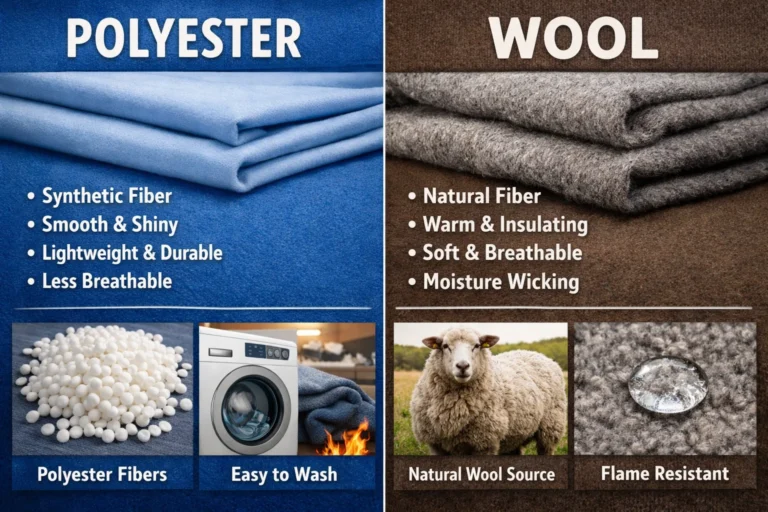
8) Yarn Behavior & Drape Considerations
The “hand” of the fabric—how it feels and hangs—is determined by fiber.
Table: Yarn Types vs. Cardigan Performance
| Fiber Type |
Warmth |
Drape |
Weight |
Notes |
| Wool |
High |
Medium/Springy |
Light |
Has “memory” (bounces back). Best for shape retention. |
| Cotton |
Low |
Low/Heavy |
Heavy |
Inelastic. Can sag over time. breathable but heavy. |
| Acrylic |
Medium |
Low/Stiff |
Light |
Affordable, washable, but can trap sweat. No memory (doesn’t block well). |
| Alpaca |
Very High |
High/Fluid |
Medium |
Extremely warm. Drapes heavily. Can grow lengthwise over time. |
| Wool/Acrylic Blend |
Medium |
Medium |
Medium |
Ideally balanced for beginners. Easy care + better drape. |
9) Shaping Techniques Explained Simply
To move away from boxy shapes, you use increases and decreases.
The Golden Rule of Shaping: Always perform increases or decreases one stitch in from the edge (selvedge edge). This leaves a clean edge for seaming.
10) Finishing Techniques (Professional Look)
A poorly finished cardigan looks amateurish regardless of how good the crocheting is.
Blocking:
This is the process of wetting the panels and pinning them to measurements to dry.
-
Why: It relaxes the fibers, evens out tension, and squares off edges.
-
When: Block your panels before seaming. It makes sewing the pieces together infinitely easier because the edges match perfectly.
Seaming:
Avoid using a slip stitch seam if possible; it creates a bulky ridge.
Weaving Ends:
Do not just tie knots and cut. Weave the tail in three directions (back and forth) inside the fabric to lock it in so it survives the washing machine.
11) Customization Options
Once you understand the panel method, you can alter the design:
-
Balloon Sleeves: Do not decrease stitches as you work down the sleeve. Keep it wide, then perform rapid decreases in the very last row before the cuff.
-
Cropped Length: Shorten the body panels. Ensure the hem hits the high waist.
-
Pockets: Crochet two small squares and sew them onto the front panels. Ensure they are placed symmetrically.
-
Texture: Use a different stitch for the sleeves than the body for a mixed-texture look.
12) Common Problems & How to Fix Them
Table: Common Mistakes vs. Solutions
| Problem |
Cause |
Solution |
| Cardigan is too wide/big |
Did not check gauge; yarn too thick. |
No fix once done. Start over with smaller hook or follow a smaller size pattern. |
| Sleeves are too tight |
Gauge was tight; forgot positive ease. |
Add a triangular gusset under the armpit or frog (unravel) and re-crochet with a larger hook. |
| Hem is curling up |
Natural tension of the stitch. |
Add a wider ribbing band; block the garment aggressively; or add a row of slip stitches. |
| Shoulder seam is bulky |
Used slip stitch or single crochet seam. |
Undo seam and use Mattress Stitch. |
| Neckline slides off shoulders |
Back panel too wide; neck opening too large. |
Add a thick collar or crochet rows of decrease stitches around the neck opening to tighten it. |
13) Care & Washing for Crochet Cardigans
Garment care depends entirely on the fiber used.
-
Superwash Wool / Acrylic: Machine washable on gentle/cool cycle in a mesh bag.
-
Standard Wool / Alpaca: Hand wash only in cool water. Never put in the dryer (it will felt and shrink).
-
Cotton: Machine washable, but often shrinks in the dryer. Air dry flat.
Storage: Never hang a crochet cardigan on a hanger. The weight of the yarn will pull the shoulders out of shape, creating “hanger bumps” and elongating the garment. Always fold and stack on a shelf.
14) Beginner FAQ
How long does it take to crochet a cardigan?
For a beginner using worsted weight yarn, expect 20 to 40 hours of work. This varies based on speed and garment complexity.
Is crocheting a cardigan hard for beginners?
Not if you choose a drop-shoulder (panel) pattern. It is essentially making squares. The difficulty lies in patience and counting stitches, not the technique itself.
How much yarn do I need?
For an average adult Medium size, you typically need 1,200 to 1,500 yards of DK or Worsted weight yarn. Always buy 1–2 extra balls to ensure dye lot consistency.
Can I crochet a cardigan without a pattern?
Yes, if you understand the math. You can measure a sweatshirt that fits you well and crochet panels to match those dimensions exactly. This is “freehanding.”
Why does my cardigan not fit?
The most likely culprit is gauge. If your tension is tighter or looser than the pattern designer’s, the size will change. Always swatch.
Can I use any yarn for a cardigan?
Technically yes, but avoid 100% cotton for heavy cables (too heavy) or scratchy rustic wools for items worn next to skin. Acrylic/Wool blends are the safest starting point.
If You Remember Only 5 Things
-
Gauge is king. Never start a garment without measuring your stitches per inch; it determines if the cardigan will fit.
-
Use the right yarn. Worsted or DK weight wool/acrylic blends are the most forgiving for beginners.
-
Block before seaming. Shaping your panels with water and pins before sewing them together ensures professional, straight seams.
-
Count your stitches. Losing or gaining stitches at the ends of rows is the most common error that ruins panel shape.
-
Fold, don’t hang. Gravity destroys crochet garments. Store your finished cardigan folded to maintain its shape.